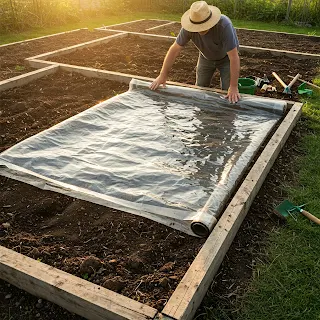
Soil solarization is an environmentally friendly, non-chemical method for controlling weeds, pests, and soil-borne pathogens. By utilizing the sun’s heat, this technique enhances soil health and boosts crop yields. This article explores the science behind soil solarization, its benefits, limitations, and step-by-step implementation to help farmers and gardeners maintain weed-free soil.
What is Soil Solarization?
Soil solarization is a method that uses transparent plastic sheeting to trap solar radiation, raising soil temperatures to lethal levels for weeds, fungi, nematodes, and other soil-borne pests. This technique is most effective in warm and sunny climates and is commonly used in agriculture and horticulture.
How Does It Work?
Traps Heat: Transparent plastic allows sunlight to penetrate while preventing heat from escaping.
Kills Weed Seeds and Pests: Soil temperatures can rise between 110°F to 140°F (43°C to 60°C), lethal to many weed seeds, fungi, and harmful microorganisms.
Enhances Soil Fertility: Decomposition of organic matter under heat increases nutrient availability for plants.
Benefits of Soil Solarization
Weed Control Without Chemicals
Reduces the need for herbicides, making it eco-friendly.
Effective against annual weeds like purslane, pigweed, and crabgrass.
Pathogen and Pest Management
Kills harmful fungi, bacteria, and nematodes that affect crop health.
Reduces insect larvae and soil-borne diseases such as Fusarium wilt and Verticillium wilt.
Improves Soil Structure and Fertility
Accelerates the breakdown of organic matter, enriching the soil with nutrients like nitrogen.
Encourages the growth of beneficial microorganisms post-solarization.
Cost-Effective and Sustainable
Requires no expensive equipment or chemicals.
Safe for organic farming and environmentally conscious gardening.
Limitations of Soil Solarization
Climate Dependent: Most effective in regions with intense sunlight and high temperatures.
Time-Consuming: Requires 4–8 weeks to achieve optimal results.
Limited to Topsoil: Does not reach deep-rooted weeds or deeply buried pathogens.
Plastic Waste: Requires proper disposal or reuse of plastic sheets to minimize environmental impact.
How to Perform Soil Solarization
Step 1: Site Selection and Preparation
Choose a site with full sunlight exposure for at least 6 hours daily.
Remove large debris, weeds, and plant residues.
Level the soil and ensure good moisture content to maximize heat transfer.
Step 2: Moistening the Soil
Water the soil thoroughly to 6-12 inches deep before covering it.
Moist soil conducts and retains heat better, enhancing the effectiveness of solarization.
Step 3: Applying the Plastic Sheet
Use clear, UV-stabilized polyethylene plastic (1-2 mils thick) to cover the soil.
Secure the edges with soil, rocks, or stakes to prevent wind displacement.
Ensure the plastic is tightly sealed to prevent heat loss.
Step 4: Solarization Period
Leave the plastic in place for 4 to 8 weeks during the hottest months (summer is ideal).
Monitor the soil temperature, ensuring it reaches 110°F to 140°F for effectiveness.
Step 5: Removal and Soil Preparation
Carefully remove the plastic without disturbing the sterilized soil.
Allow the soil to cool before planting crops.
Apply mulch or compost to enhance microbial regeneration.
Best Plants to Grow After Solarization
Soil solarization creates a weed-free and nutrient-rich environment, making it ideal for planting:
Vegetables: Tomatoes, peppers, carrots, lettuce, and cucumbers.
Herbs: Basil, cilantro, and parsley.
Fruits: Strawberries and melons.
Flowers: Marigolds, petunias, and zinnias.
Enhancing Soil Solarization with Biofumigation
Biofumigation is the process of integrating organic materials (e.g., mustard plant residues) with solarization to boost pest and disease control. The decomposition releases natural fumigants that further suppress weeds and pathogens.
How to Implement Biofumigation?
Incorporate green manure (e.g., mustard, radish) into the soil before solarization.
Follow the standard solarization procedure to enhance efficacy.
The combined effect improves soil quality and extends pest control benefits.
Frequently Asked Questions (FAQs)
1. Does soil solarization work in cloudy areas?
While direct sunlight increases effectiveness, partial solarization can still reduce weed seed viability and some pathogens.
2. Can I use black plastic instead of clear plastic?
No, clear plastic is preferred as it allows maximum sunlight penetration, whereas black plastic absorbs heat but doesn’t transmit it effectively.
3. How long should I wait before planting after solarization?
Allow the soil to cool for 7-14 days before planting crops.
4. Can soil solarization kill beneficial microorganisms?
Some beneficial microbes may be affected, but populations generally recover quickly post-solarization.
Conclusion
Soil solarization is an effective, sustainable method for controlling weeds, soil-borne pathogens, and pests without chemicals. While it works best in hot climates, strategic modifications such as biofumigation can enhance its efficiency. By implementing this technique, farmers and gardeners can promote healthier, more productive soil while reducing dependency on herbicides and pesticides.
Would you consider integrating soil solarization into your farming or gardening practices? Let us know your experiences and thoughts!

No comments:
Post a Comment